
Comparison 1stPlayer Fire Dancing V2 black vs Zalman Z11 Plus black
Add to comparison | 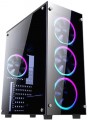 | 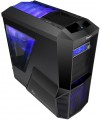 |
|---|---|---|
| 1stPlayer Fire Dancing V2 black | Zalman Z11 Plus black | |
| Outdated Product | from $87.22 up to $104.48 | |
| TOP sellers | ||
In the HF1 modification, complete fans with red illumination, and in the standard one with blue illumination. | ||
| Features | gaming | gaming |
| Form factor | Midi Tower | Midi Tower |
| Mount | vertical | vertical |
| Motherboard support | ATX | ATX |
| PSU form factor | ATX (regular) | ATX (regular) |
Computer case | ||
| Dimensions (HxWxD) | 400x185x375 mm | 498x260x525 mm |
| Graphics card max lenght | 350 mm | 295 mm |
| Fan max height | 160 mm | 160 mm |
| Weight | 2.5 kg | 7.3 kg |
| Material | steel | steel |
| Sidewall thickness | 0.4 mm | |
| Rubber feet |  | |
| Lighting type | backlit fan | backlit fan |
| Lighting colour | RGB | blue |
| Side panel | removable | removable |
Storage | ||
| PSU |  | |
| PSU mount | top | bottom |
| 5.25" bays | 4 | |
| 3.5" external bays | 1 | |
| 3.5" bays | 5 | |
| Expansion slots | 7 | 7 |
| Screwless | | |
Cooling | ||
| Installed fans | 4 шт | 4 шт |
| Fans (back) | 1x120mm | 1x120mm |
| Fans (front) | 3x120mm | 1x120/140mm |
| Fans (side) | 2x80mm | |
| Fans (top) | 2x120/140mm | |
| Fans (bottom) | 1x120/140mm | |
| Fan mounts total | 4 | 7 |
| Dust filter | + | |
| Liquid cooling system support | | |
Connectors and functions | ||
| Placement | on top of the case | on top of the case |
| Fan controler | | |
| USB-A 2.0 | 2 pcs | 2 pcs |
| USB-A 5Gbps | 1 pcs | 2 pcs |
| Audio (microphone/headphones) | | |
More features | ||
| Front panel | lattice | |
| Side panel window | + | + |
| More features | CPU cooling mount window | hidden wiring CPU cooling mount window |
| Color | ||
| Added to E-Catalog | april 2019 | february 2012 |


Compare 1stPlayer Fire Dancing V2 and Zalman Z11 Plus
You may be interested in
My comparisons
1stPlayer Fire Dancing V2 often compared


Zalman Z11 Plus often compared


Glossary
Graphics card max lenght
The maximum length of a graphics card that can be installed in this case.
Modern mid-range and top-end video cards with high performance often differ in considerable length, which is why such a card can not fit into any case. So before collecting components, it is worth evaluating the length of the proposed graphics card and choosing a case in which it is guaranteed to fit. This forethought is useful anyway, but it's especially true if you're building a system that requires a powerful graphics adapter, such as a high-end gaming PC or 3D design workstation.
Modern mid-range and top-end video cards with high performance often differ in considerable length, which is why such a card can not fit into any case. So before collecting components, it is worth evaluating the length of the proposed graphics card and choosing a case in which it is guaranteed to fit. This forethought is useful anyway, but it's especially true if you're building a system that requires a powerful graphics adapter, such as a high-end gaming PC or 3D design workstation.
Sidewall thickness
The thickness of the side walls used in the case. When choosing a thickness, manufacturers have to compromise between several points at once. On the one hand, thin walls are inexpensive and heat dissipates faster through them, which has a positive effect on cooling efficiency. On the other hand, powerful systems inevitably require thick walls, otherwise the case may simply not withstand the weight of advanced high-performance components. Thirdly, steel is a fairly durable material even with a relatively small thickness. In light of all this, in most models this indicator does not exceed 0.7 — 0.8 mm, and more often it is about 0.5 – 0.6 mm.
Lighting colour
For more on decorative lighting in general, see Light Type above. Here we note that it can have different shades, and sometimes several options are indicated in the characteristics at once. If these options are listed through "and" (for example, "red, blue and green") — this means that this model contains all the specified colours, and the user can switch between them at his discretion. If the shades are listed through “or” (for example, “red, blue or green”), this means that this model is available in several versions that differ in the colour of the backlight.
Special mention is the "RGB" option. This is the name of the most advanced backlight, the shade of which can be chosen at your discretion. However the original RGB backlighting is capable of simultaneously displaying only one of several basic colours (white, yellow, green, red, blue or purple); nevertheless, even these possibilities are enough to customize the appearance of the case and apply various effects (such as backlight synchronization — see below).
And relatively recently, an even more advanced type of adjustable systems has appeared — ARGB backlight. The key difference between ARGB and classic RGB is the possibility of simultaneous operation of diodes of different colours. In other words, classic RGB lighting can display only one colour at a time, while ARGB can display several colours, which provides additional effects. Also, ARGB lighting is connecte...d using a 3pin 5v connector, while regular RGB uses a 4pin 12v connection. It can be represented by various types of illumination. So, ARGB is often integrated into the cooling system, the front panel and magnetic LED strips, which the user can mount at his discretion. To control the backlight, a special controller is usually provided, and buttons or controls for switching the illumination operation modes are placed on the interface panel. In some cases, the backlight is controlled by the motherboard, through a special connector. Many ARGB systems support the ability to fine-tune through specialized software.
Special mention is the "RGB" option. This is the name of the most advanced backlight, the shade of which can be chosen at your discretion. However the original RGB backlighting is capable of simultaneously displaying only one of several basic colours (white, yellow, green, red, blue or purple); nevertheless, even these possibilities are enough to customize the appearance of the case and apply various effects (such as backlight synchronization — see below).
And relatively recently, an even more advanced type of adjustable systems has appeared — ARGB backlight. The key difference between ARGB and classic RGB is the possibility of simultaneous operation of diodes of different colours. In other words, classic RGB lighting can display only one colour at a time, while ARGB can display several colours, which provides additional effects. Also, ARGB lighting is connecte...d using a 3pin 5v connector, while regular RGB uses a 4pin 12v connection. It can be represented by various types of illumination. So, ARGB is often integrated into the cooling system, the front panel and magnetic LED strips, which the user can mount at his discretion. To control the backlight, a special controller is usually provided, and buttons or controls for switching the illumination operation modes are placed on the interface panel. In some cases, the backlight is controlled by the motherboard, through a special connector. Many ARGB systems support the ability to fine-tune through specialized software.
PSU mount
The location of the power supply (or seat for the power supply) in the case.
The traditional option is the top location of the PSU, this is a familiar and familiar option for many. However, heated air from other system components accumulates in the top of the case, reducing cooling efficiency. Cases with a lower location of the PSU are deprived of this drawback, however, a lot of dust and other contaminants get into them if the system unit is installed on the floor. However, this difference becomes critical only when using high-performance systems with appropriate heat dissipation; for an ordinary household PC, the location of the power supply unit as a whole is not important.
Also note that in miniature cases like mini-Tower (see "Form factor"), the PSU installed on top can overlap part of the motherboard, which further worsens the cooling efficiency and makes it difficult to install large CPU coolers; however, it all depends on the layout of a particular case.
The traditional option is the top location of the PSU, this is a familiar and familiar option for many. However, heated air from other system components accumulates in the top of the case, reducing cooling efficiency. Cases with a lower location of the PSU are deprived of this drawback, however, a lot of dust and other contaminants get into them if the system unit is installed on the floor. However, this difference becomes critical only when using high-performance systems with appropriate heat dissipation; for an ordinary household PC, the location of the power supply unit as a whole is not important.
Also note that in miniature cases like mini-Tower (see "Form factor"), the PSU installed on top can overlap part of the motherboard, which further worsens the cooling efficiency and makes it difficult to install large CPU coolers; however, it all depends on the layout of a particular case.
5.25" bays
The number of 5.25" form factor bays provided in the case design. Such bays are made only external, that is, they can be accessed from the outside without opening the case (unlike 3.5", see the corresponding glossary items). Today, 5.25" bays are mainly used for installing optical disk drives, internal hard drives in removable pocket adapters (Mobile Rack), and sometimes additional fans. Also, 3.5" devices can be installed in such bays using special adapters. ". Most cases are equipped with 1 5.25" bay or two bays. But there are models with 3 or more bays, as well as cases without external bays.
3.5" external bays
The number of external 3.5" component bays provided in the case. The name "external" means that the bay has an exit to the outside (usually to the front panel), and can be reached without opening the case. One of the most popular options the use of such slots — the installation of card readers; in addition, they can be used for other components — in particular, USB hubs.
The number of bays corresponds to the number of external components that can be simultaneously installed in the case. However, this form factor is not particularly popular in the outer periphery, so cases with more than 2 such compartments are rare.
The number of bays corresponds to the number of external components that can be simultaneously installed in the case. However, this form factor is not particularly popular in the outer periphery, so cases with more than 2 such compartments are rare.
3.5" bays
The number of internal 3.5" form factor bays provided in the design of the case. Such bays, in accordance with the name, are intended for internal components, mainly hard drives and some SSD modules; to access them, the case must be disassembled.
Theoretically, the number of bays corresponds to the maximum number of drives that can be installed in the chassis. However, in fact, the best option is to install drives through a single slot to ensure efficient cooling. Accordingly, it is best to select a case in such a way that the number of internal 3.5" bays is twice the expected number of hard drives.
Theoretically, the number of bays corresponds to the maximum number of drives that can be installed in the chassis. However, in fact, the best option is to install drives through a single slot to ensure efficient cooling. Accordingly, it is best to select a case in such a way that the number of internal 3.5" bays is twice the expected number of hard drives.
Screwless
The ability to use special latches (instead of screws) to mount peripheral devices in 3.5" and 5.25 bays, as well as cards in expansion slots. This screwless mounting greatly simplifies the installation and replacement of system components.
Fans (front)
The number of fan slots on the front of the case, and the size of the fans these slots are designed for. The presence of the fans themselves in the kit should be specified separately.
The larger the fan, the more advanced it is considered: a large diameter allows you to work efficiently at relatively low speeds, which reduces the noise level and energy consumption. Case fans are available in several standard diameters; specifically for the front panel, the size up to 92 mm is considered relatively small, 120 mm — medium, 140 mm — large, and in the most advanced solutions, fans of 180 mm or even more can be installed.
Also note that most often the holes for installing fans are designed for one specific size, however, there are also “multi-size” seats, for 2-3 options. Moreover, these options may differ both in diameter and in quantity: for example, it may be possible to install two 140 mm fans or three 120 mm fans.
The larger the fan, the more advanced it is considered: a large diameter allows you to work efficiently at relatively low speeds, which reduces the noise level and energy consumption. Case fans are available in several standard diameters; specifically for the front panel, the size up to 92 mm is considered relatively small, 120 mm — medium, 140 mm — large, and in the most advanced solutions, fans of 180 mm or even more can be installed.
Also note that most often the holes for installing fans are designed for one specific size, however, there are also “multi-size” seats, for 2-3 options. Moreover, these options may differ both in diameter and in quantity: for example, it may be possible to install two 140 mm fans or three 120 mm fans.